


Introduction to Root Canal Therapy
Welcome to our guide on root canal treatments – a topic that might sound intimidating but is actually a common and highly effective dental procedure. If you’ve been told you need a root canal, fear not! We’re here to walk you through the process step by step, so you can feel informed and confident about your treatment. Let’s dive into the 5 stages of root canal therapy and demystify this essential dental procedure together!
Stage 1: Diagnosis and Preparation
When it comes to root canal treatments, the first stage is crucial: Diagnosis and Preparation. This is where your dentist will assess the condition of your tooth to determine if a root canal is necessary. Through X-rays and examination, they can identify any signs of infection or damage to the pulp inside the tooth.
Once the diagnosis is confirmed, the preparation phase begins. Your dentist will numb the area around the affected tooth using local anesthesia to ensure you are comfortable throughout the procedure. This step is essential in ensuring that you experience minimal pain during the treatment.
After numbing the tooth, your dentist will isolate it with a rubber dam to keep it clean and dry during the procedure. This also helps in preventing bacteria from entering and causing further infection. The dentist will then use specialized tools to access and remove any damaged or infected pulp from within the tooth.
By completing this initial stage effectively, your dentist sets a solid foundation for successful root canal therapy ahead!
Stage 2: Numbing the Tooth
When it comes to root canal treatments, the second stage involves numbing the tooth to ensure your comfort throughout the procedure. Numbing the tooth is a crucial step in making sure you feel little to no pain during the treatment. By using local anesthesia, your dentist will numb the area around the affected tooth before starting any work.
The numbing process typically involves a small needle and may cause slight discomfort for a brief moment. However, this discomfort is minimal compared to any potential pain from untreated dental issues. Once the anesthesia takes effect, you should not feel any pain or sensitivity as your dentist continues with the root canal therapy.
Remember that proper numbing ensures a smoother treatment experience and allows your dentist to focus on resolving the underlying issue without causing unnecessary discomfort. Trust in your dentist’s expertise and let them take care of ensuring you are comfortable throughout each stage of your root canal therapy.
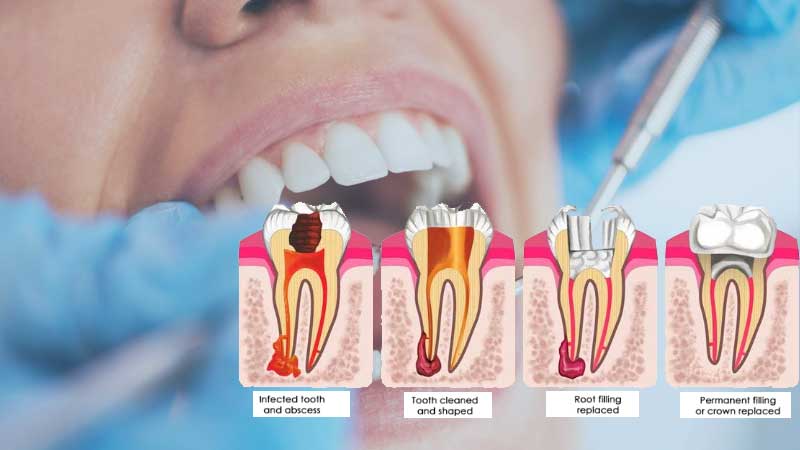
Stage 3: Removing the Infected Pulp
Stage 3 of root canal therapy involves the crucial step of removing the infected pulp from the tooth. This is where the dentist carefully accesses the inner chamber of the tooth to eliminate any damaged or decayed tissue that may be causing pain and infection.
Using specialized tools, such as small files and irrigation solutions, the dentist meticulously cleans out all traces of infected pulp from inside the tooth. This process aims to ensure that no harmful bacteria remain, preventing further damage and promoting healing.
By removing the infected pulp, the dentist helps to save your natural tooth from extraction while also alleviating any discomfort you may have been experiencing due to inflammation or infection. It’s a necessary stage in restoring oral health and preserving your smile for years to come.
Once this step is completed successfully, it sets the foundation for cleaning and shaping the canals in preparation for filling and sealing – bringing you one step closer to completing your root canal treatment journey.
Stage 4: Cleaning and Shaping the Canals
Once the infected pulp has been removed from the tooth during a root canal treatment, the next crucial step is cleaning and shaping the canals. This stage ensures that any remaining bacteria are eliminated to prevent reinfection.
The dentist will use specialized tools to clean out the canals thoroughly. This process helps in removing any debris or infected tissue left behind after removing the pulp.
Shaping of the canals is done to create space for filling material later on. By shaping the canals correctly, it allows for better sealing of the tooth to prevent further infection or complications.
Proper cleaning and shaping of the canals are vital in ensuring the success of a root canal treatment. It sets up a strong foundation for restoring function and health back to your tooth.
Trust your dentist’s expertise during this stage as they work meticulously to ensure thorough cleaning and precise shaping of the canals before proceeding with filling and sealing your tooth.
Stage 5: Filling and Sealing the Tooth
After the infected pulp has been removed and the canals have been cleaned, it’s time to fill and seal the tooth during this crucial stage of root canal therapy. Filling the tooth involves using a material called gutta-percha, which is placed into the canals to replace the removed pulp. This helps to prevent any further infection from developing in those areas.
Once the canals are filled, they are sealed off with a sealer paste to ensure that no bacteria can re-enter and cause more trouble. The sealing process is vital in protecting your tooth from future infections or complications. After filling and sealing, a temporary or permanent filling may be placed on top for added protection.
This final step not only safeguards your treated tooth but also restores its strength and function. It’s essential for ensuring that you can continue using your tooth without any issues post-treatment. So, while it may seem like just another step in the process, filling and sealing play a significant role in completing successful root canal therapy.
Recovery and Aftercare Tips
After undergoing root canal therapy, it’s essential to prioritize your recovery and follow proper aftercare tips for optimal healing.
Once the procedure is complete, you may experience some tenderness in the treated tooth area. This discomfort is normal and can usually be managed with over-the-counter pain medications as recommended by your dentist.
It’s crucial to avoid chewing on hard or sticky foods immediately after the procedure to prevent any damage to the tooth that underwent treatment. Opt for softer foods that are easier on your teeth during this time.
Maintaining good oral hygiene is key post-root canal therapy. Continue brushing and flossing regularly but do so gently around the treated tooth to avoid irritation.
Attend all scheduled follow-up appointments with your dentist to ensure proper healing progress and address any concerns promptly.
By following these recovery and aftercare tips diligently, you can help promote a successful outcome from your root canal treatment. Your dedication to these practices will contribute significantly to restoring your oral health back on track.
Conclusion
Root canal treatments are a common dental procedure aimed at saving teeth that would otherwise need to be extracted due to infection. By understanding the 5 stages of root canal therapy, patients can feel more informed and prepared when facing this treatment.
From the initial diagnosis and preparation to the final filling and sealing of the tooth, each stage plays a crucial role in restoring oral health and relieving pain. Numbing the tooth, removing infected pulp, cleaning and shaping the canals are all essential steps that dentists undertake with precision and care.
Recovery after a root canal is relatively quick for most patients, but following aftercare tips diligently can help ensure successful healing. Regular follow-up appointments with your dentist will also be necessary to monitor progress and maintain optimal oral health.
While root canal therapy may seem daunting at first, it is a highly effective treatment that allows you to keep your natural teeth intact. Trusting your dentist throughout each stage of the process will lead to a healthier smile in the long run. Remember that prevention is always key – maintaining good oral hygiene practices can help reduce the likelihood of needing extensive dental procedures like root canals in the future.


